Déconnecté1 888 344-4424EN

-
Champ d’application
- Tous les produits
- Santé - Sécurité
- Prothèses amovibles
- Tous les produits
- Prise d’empreintes et registres
- Coulée des modèles et MEA
- Reproduction de modèle et prothèse
- Cirage & montage
- Mise en moufle
- Acrylique - Bourrage - Injection
- Échaudage - Cuisson - Démouflage
- Meulage / coupage / sablage
- Adaptation
- Polissage - Finition
- Prothèses sur implants
- Réparations - renforts
- Rebasage & Conditionnement
- Autres matériaux
- Accessoires Bucaux
- Boîtes et emballage
- Meubles
- Prothèses fixes
- Tous les produits
- Coulée des empreintes
- Grossissement
- Fabrication des modèles et MEA
- Cirage, maquettes
- Procédé Céramique
- Tous les produits
- Stratification de céramique
- Lingotins
- Fours et accessoires de cuisson
- Couper - Former - Texturer
- Maquillage et glaçure
- Polissage
- Cimentation et Mordançage
- Procédé Métal
- Procédé Zircone
- Procédé composite
- Mise en revêtement
- Enfournement - Dépouillage
- Adaptation
- Boîtes et emballage
- Pièces squelettiques
- Orthodontie
- Tous les produits
- Fabrication de modèles, mise en articulation
- Reproduction de modèle
- Cirage
- Instruments et équipements
- Pinces pour fils métalliques
- Fils métalliques
- Acryliques Ortho & additifs
- Acryliques pour plaques occlusales
- Thermoplastiques
- Meulage / coupage / sablage
- Polissage - Finition
- Boîtes et emballage
-
Produits
- Tous les produits
- Produits DenPlus
- Acryliques
- Tous les produits
- Résine DenPlus
- Résines à cuisson conventionnelle
- Résine pour cuisson par micro-ondes
- Résine fluide pour coulée
- Résines de réparation
- Résines auto-polymérisables pour porte-empreintes
- Résines pour regarnissage
- Résines orthodontiques
- Résines thermoflexibles
- Résines radiopaques
- Résines teintes de dent
- Abrasifs, Fraises, Polissoirs et Disques
- Tous les produits
- Abrasifs
- Fraises
- Tous les produits
- Mini-catalogue fraises au carbure Diaswiss
- Fraises au carbure pour pièce à main
- Fraises spécialisées
- Fraises au carbure pour moteur
- Fraises pour turbine haute vitesse
- Fraises Infiniti pour pièce à main
- Fraises avec revêtement nitrure de titane
- Fraises DLC (Diamond-Like-Carbon)
- Fraises diamantées électroplaquées
- Fraises diamantées frittées
- Fraises pour finition des bases molles
- Pour technique de fraisage parallèle
- Fraises pour zircone
- Fraises Typhoon
- Organisation fraises
- Disques
- Roues et pointes abrasives, polissoirs
- Tous les produits
- Roues abrasives et pointes pour acryliques
- Roues abrasives et pointes pour zircone
- Roues et pointes d’oxyde d’aluminium
- Roues et pointes en carbure de silicium
- Roues pour meulage sans chaleur (Heatless)
- Meules pour moteur
- Bandes abrasives
- Roues et pointes en polyuréthane
- Roues et pointes en caoutchouc
- Roues et pointes en silicone
- Mandrins
- Roues pour taille-modèle
- Accessoires
- Articulateurs et arcs faciaux
- Brûleurs
- Numérique
- Tous les produits
- Mini-catalogue Numérique
- Logiciels
- Scanners dentaires
- Impression 3D
- Usinage
- Céramiques
- Cires
- Dents
- Die et modèle
- Boîtes et Emballage
- Empreintes
- Tous les produits
- Accessoires pour matériaux d’empreinte
- Polysulfure
- Adhésifs pour porte-empreintes
- Alginates
- Base de caoutchouc
- Bols de mélange
- Enregistrement occlusal
- Pistolet et embouts mélangeurs
- Polyéther
- Porte-empreintes
- Masques gingivaux
- Mastic pour empreintes
- Nettoyants pour alginate
- Seringues pour alginate
- Thermoplastiques - Composés
- Vinyl Polyether Silicone (VPES)
- Vinyl Polysiloxane (VPS)
- Oxyde de zinc - Eugénol & Non-Eugénol
- Équipements
- Tous les produits
- Anti-éclabousseurs
- Bains ultrasoniques
- Balances
- Burins électriques/pneumatiques
- Chauffe-cire
- Clinique
- Collecteurs de poussières
- Détoureuse pour arche
- Échaudeuses pour cire
- Coulée métaux
- Foreuse à goujons
- Fournaises
- Hottes et purificateurs d’air
- Lampes
- Loupes
- Mélangeurs
- Mélangeurs pour hydrocolloïde
- Meuleuses/polisseuse à haute vitesse pour métal
- Micromoteurs - pièces à main
- Microscopes
- Moteurs
- Moulage sous vide
- Nettoyeurs à vapeur
- Nettoyeurs de prothèses
- Équipement à photopolymériser
- Polissoirs
- Pots à pression
- Presse Hydraulique
- Systèmes à injection
- Sableuse
- Spatules chauffantes
- Stérilisateurs et autoclaves
- Taille-modèles
- Trappes et bennes à plâtre
- Turbines haute vitesse
- Unité de soudage
- Unités de cuisson pour prothèse
- Vibreurs
- Instruments
- Matériaux photopolymérisants
- Meubles
- Moulage sous vide
- Orthodontie
- Pinceaux, Brosses et polissoirs
- Plâtres, pierres et revêtements
- Ponts & couronnes
- Prévention et cosmétique
- Produits chimiques
- Prothèses amovibles
- Tous les produits
- Résines pour base dentaire
- Regarnissage de prothèse
- Prothèses partielles
- Accessoires pour prothèses
- Tous les produits
- Caractérisation
- Crochets métalliques
- Crochets en plastique
- Feuilles séparatrices - mise en moufle
- Fibres
- Fils
- Presse à rebasage
- Jauges, Compas, Plan occlusal
- Liquide séparateur
- Matériaux à duplication
- Moufles et brides
- Moufles pour duplication
- Pâte isolante
- Plaques bases
- Polissage
- Treillis et renforts
- Sécurité
- Usage unique
-
Équipements
- Tous les produits
- Anti-éclabousseurs
- Bains ultrasoniques
- Balances
- Burins électriques/pneumatiques
- Chauffe-cire
- Clinique
- Collecteurs de poussières
- Détoureuse pour arche
- Échaudeuses pour cire
- Coulée métaux
- Foreuse à goujons
- Fournaises
- Hottes et purificateurs d’air
- Lampes
- Loupes
- Mélangeurs
- Mélangeurs pour hydrocolloïde
- Meuleuses/polisseuse à haute vitesse pour métal
- Micromoteurs - pièces à main
- Microscopes
- Moteurs
- Moulage sous vide
- Nettoyeurs à vapeur
- Nettoyeurs de prothèses
- Équipement à photopolymériser
- Polissoirs
- Pots à pression
- Presse Hydraulique
- Systèmes à injection
- Sableuse
- Spatules chauffantes
- Stérilisateurs et autoclaves
- Taille-modèles
- Trappes et bennes à plâtre
- Turbines haute vitesse
- Unité de soudage
- Unités de cuisson pour prothèse
- Vibreurs
-
Numérique
- Tous les produits
- Mini-catalogue Numérique
- Logiciels
- Scanners dentaires
- Impression 3D
- Usinage
- Dents
-
Fabricants
- Tous les produits
- 3M ESPE
- American Tooth Industries
- ASA Dental
- Aurelia par Supermax Healthcare Canada
- Bausch
- Beaverstate Dental
- Besqual
- Brewer
- Buffalo Dental
- Canadian Hospital Specialities Ltd
- CMP Industries
- Crosstex
- Dedeco
- DenPlus
- Dental Creations
- Dentalfarm
- Dentsply
- Detax
- Diaswiss
- Dreve
- DTS
- Enbio
- Esma Incorporated
- exocad
- FAG Dentaire
- Flashforge
- Flight Dental Systems
- Foredom Electric
- Garreco
- GC America
- Grobet
- Hager
- Hammacher
- Handler
- Hatho
- Invent Dental
- Isonic
- Kerr
- Keystone Industries
- Kube Innovation
- Lang Dental
- Lascod
- LeoneAmerica
- Malzer Dental
- Mark3
- Meta Dental
- Micrylium
- MPF Brush Co
- Myerson
- Nabertherm
- NK-Optik
- Pac-Dent
- Phare Médica
- Phrozen
- Pi Dental
- Prodont Holliger
- pro3dure medical
- PRO-TECH
- Protechno
- Quatro Air
- Ransom & Randolph
- Ray Foster
- Razertip
- Reliable Corporation
- Renfert
- Saeyang
- Scantist 3D
- Schottlander
- Shenpaz
- Shining 3D
- Song Young
- Synca
- Tapmaster
- Tokuyama Dental
- Uvitron International
- Vacalon
- Vita
- Wells Dental
- Whip Mix
- Winder Research
- Yamahachi Dental
- Yates Motloid
- Yeti
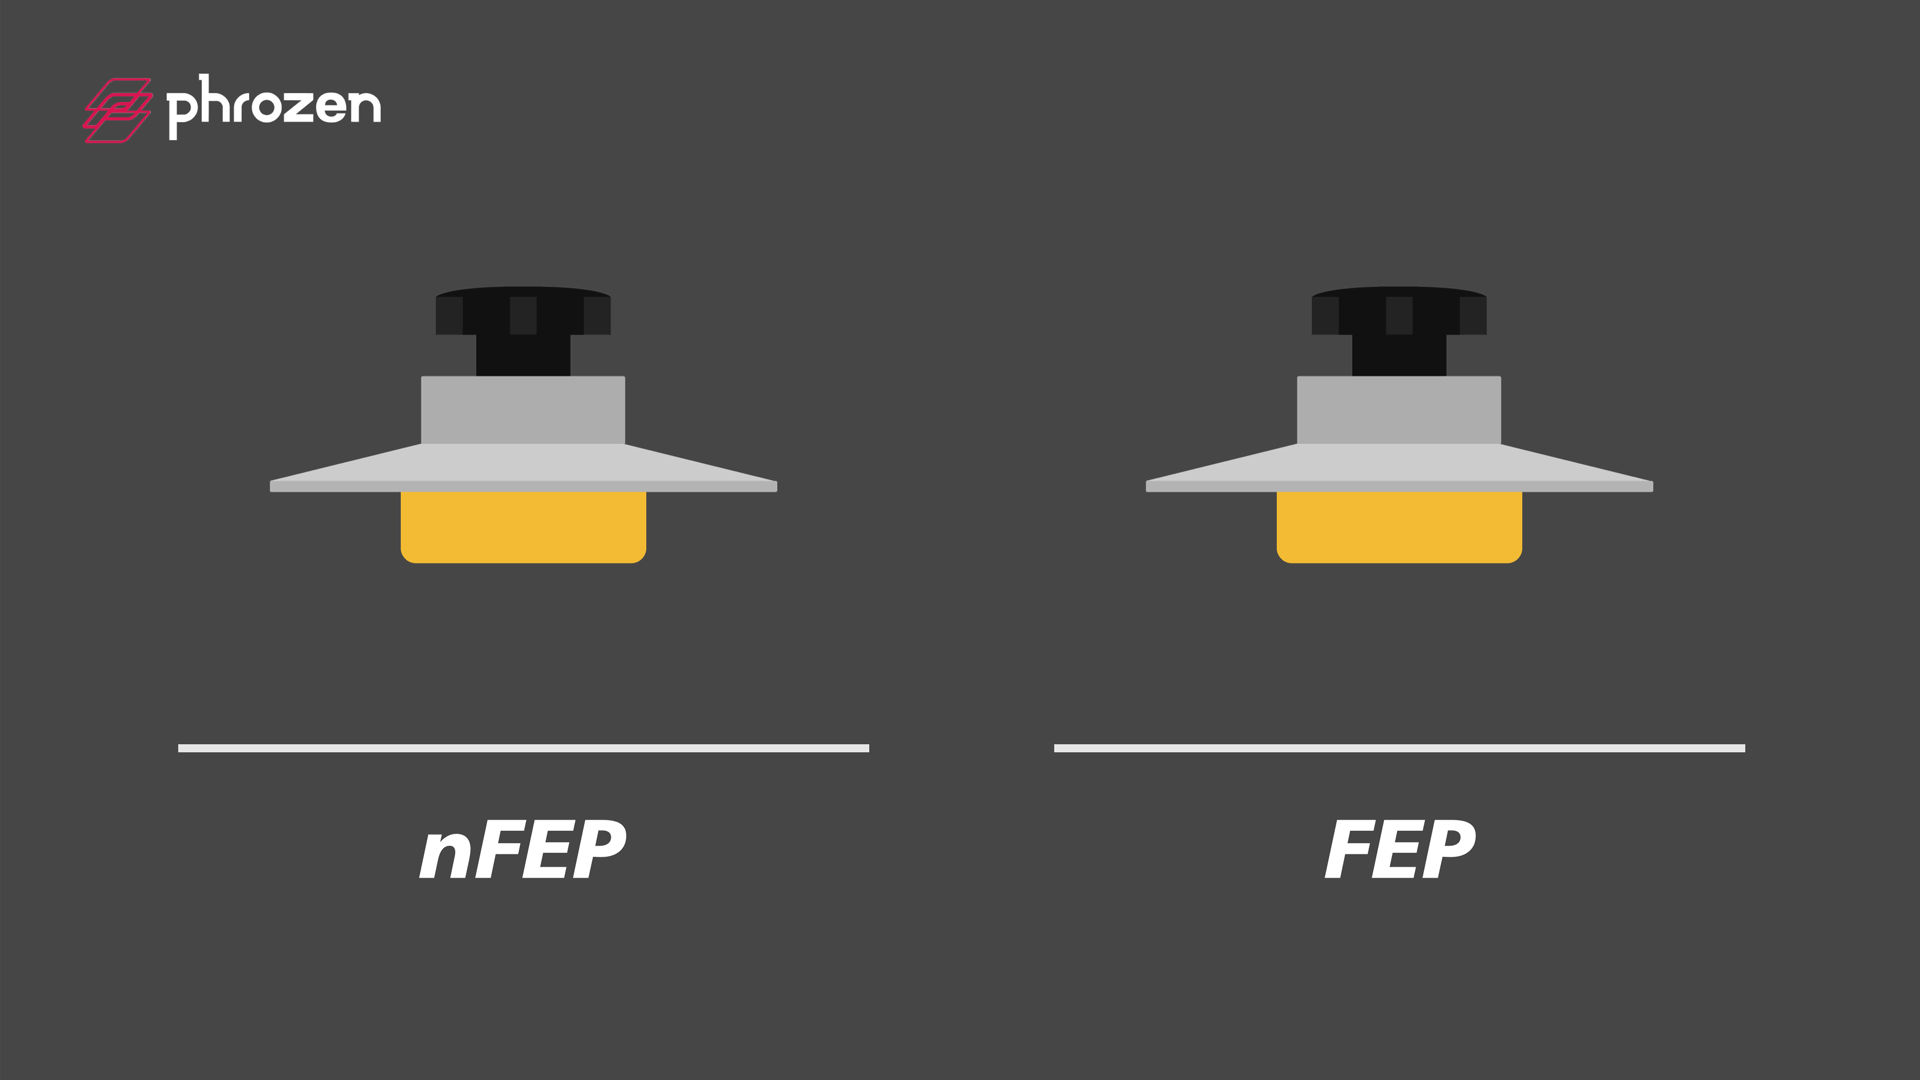
Les pellicules PFA (nFEP) de Phrozen sont spécialement conçues pour durer plus longtemps que les pellicules FEP régulières et permettent aux utilisateurs d’imprimer plusieurs fois des modèles 3D de haute qualité sans se soucier constamment de changer de film. Après avoir imprimé un modèle, nettoyez simplement le film et vous serez prêt pour votre prochain projet d’impression!
La pellicule FEP et la pellicule nFEP sont des feuilles transparentes qui laissent passer les rayons UV afin que la résine puisse durcir facilement. Ces films sont attachés à la cuve en résine afin que le modèle 3D en résine puisse être imprimé sur la surface du film. Selon la fréquence d’utilisation, les deux peuvent devoir être remplacés périodiquement.
Quelle est la différence entre les deux?
Le film nFEP est un film FEP spécialement traité qui a une surface plus lisse et plus délicate. Le matériau utilisé pour le film nFEP lui permet de fournir moins de force d’aspiration par rapport au film FEP pendant l’impression. Cela signifie que vous aurez un taux de réussite plus élevé dans l’impression sur résine lorsque le film nFEP est installé. Le film nFep est particulièrement adapté aux résines à durcissement rapide.
- Matériel: nFEP
- Couleur: transparent
- Taille: A4 (210 * 290 mm)
- Épaisseur: 150 um
- Poids: 10 g
- Modèles applicables: Sonic 4K, Sonic XL 4K
- Contenu: 1 x pellicule Phrozen nFEP (A4 / 210 * 290 mm)
QUAND DOIS-JE CHANGER MON FILM FEP?
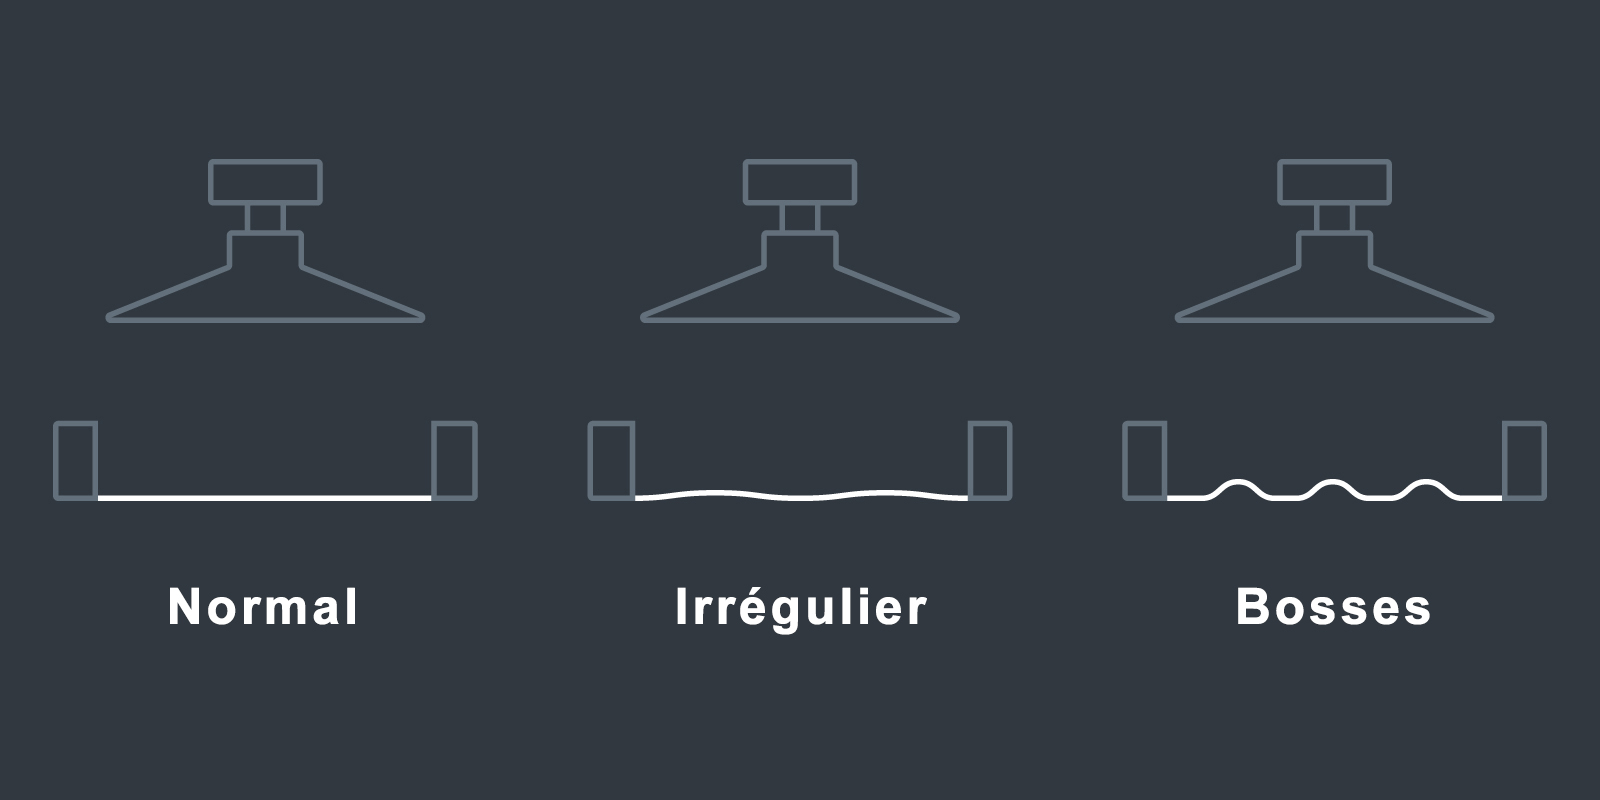
1. Tenez votre film FEP vers la lumière pour vérifier s’il est rayé ou endommagé. Si le film FEP est rayé ou irrégulier, il peut fonctionner normalement mais vous devez effectuer un test d’impression pour voir s’il produit des erreurs lors de l’impression. Si tel est le cas, vous devez changer votre film FEP rapidement.
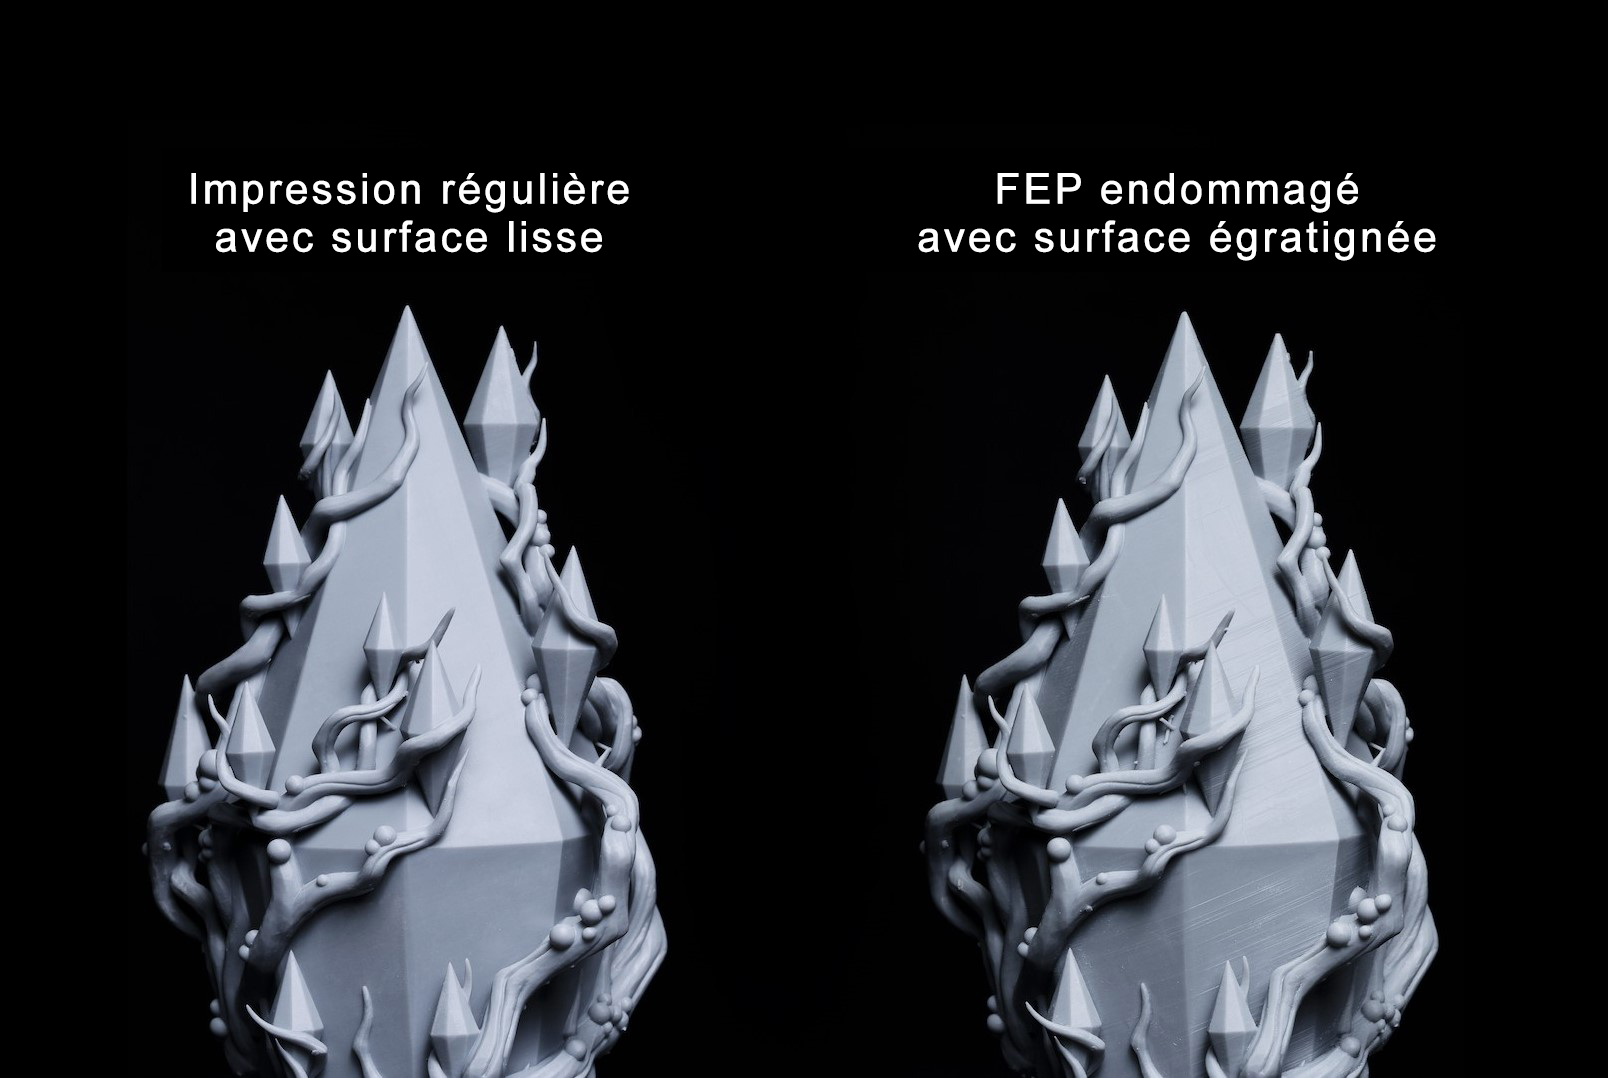
2. Si votre film FEP a une bosse dessus, il peut être endommagé et vous devez le remplacer.
COMMENT REMPLACER MON FILM FEP?
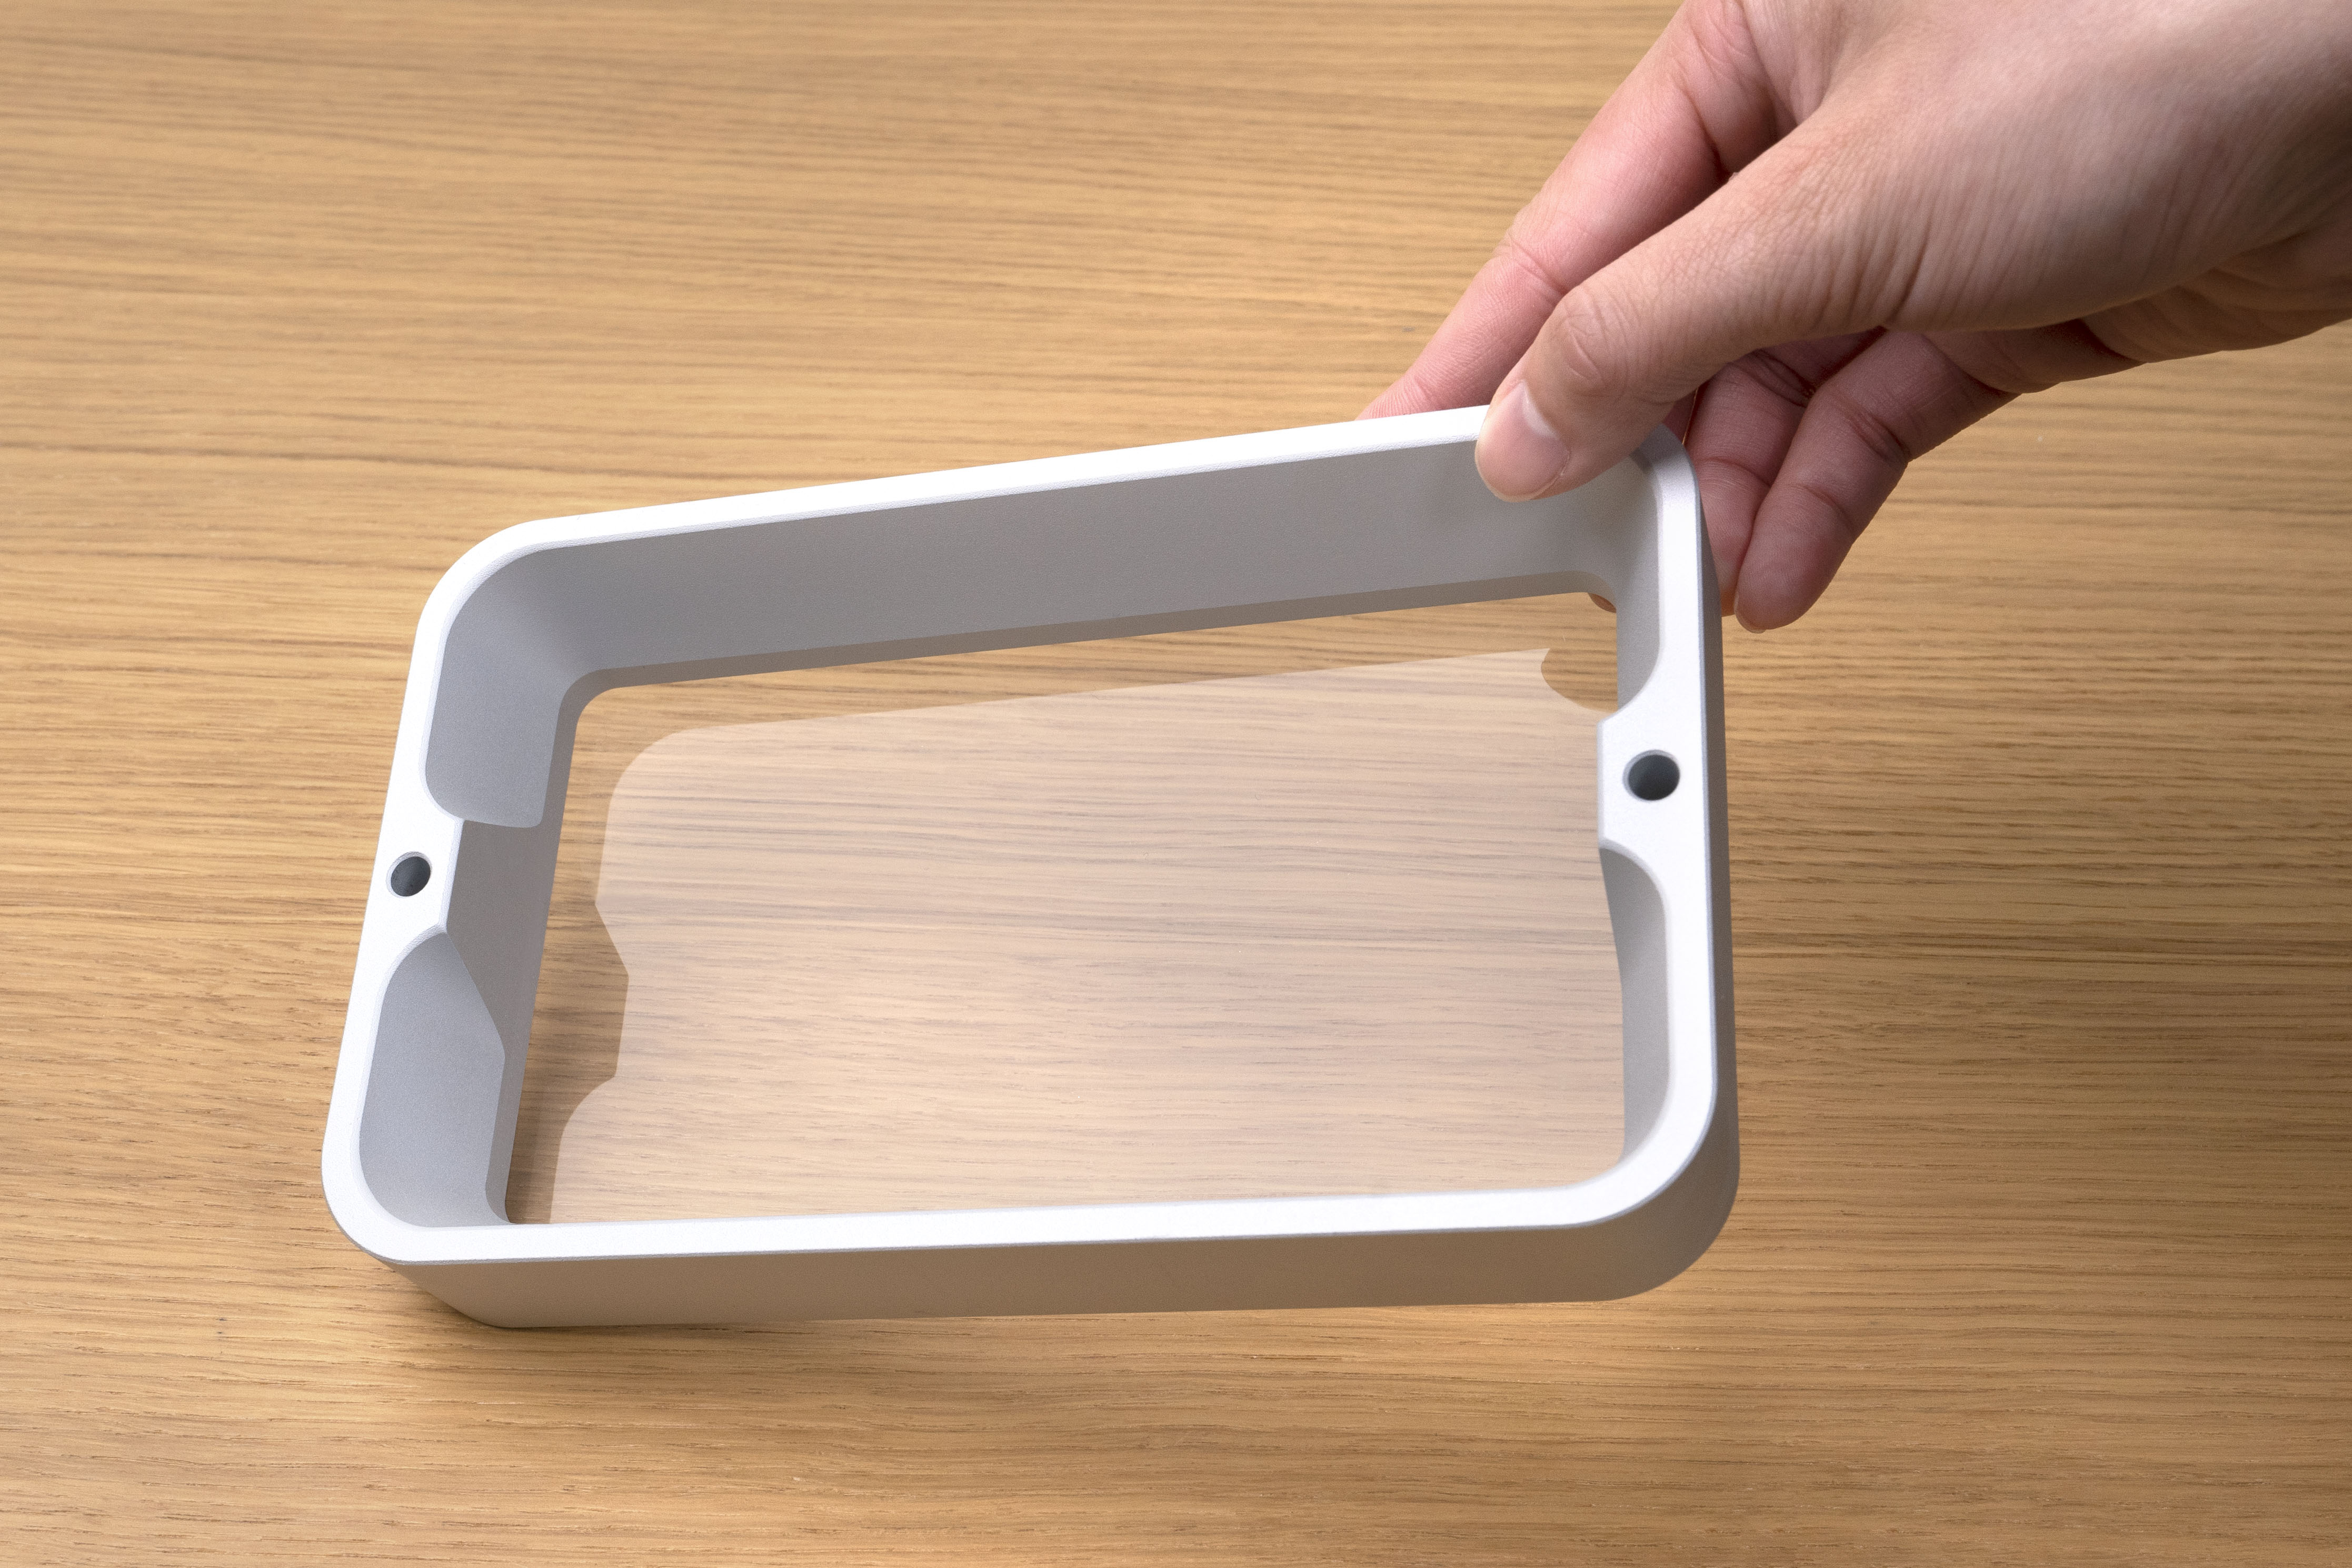
Un film FEP doit être remplacé une fois qu’il est bosselé, déformé ou percé. Les petites rayures et / ou taches sur le film ne nécessitent pas de remplacement car elles n’affectent pas la qualité d’impression. Ce qui suit est un guide pour remplacer votre film FEP:
Retrait du film FEP
Étape 1: Retirez le couvercle en plastique de votre imprimante 3D résine.
Étape 2: Assurez-vous que la plaque de construction est complètement rétractée. Si ce n’est pas le cas, allumez l’appareil et sur l’écran tactile, cliquez sur OUTILS, puis sur MANUEL, puis soulevez la plaque de construction vers le haut.
* Remarque: NE dépassez PAS la limite de hauteur de l’axe Z. S’il dépasse la limite, la plaque de construction restera bloquée en haut.
Étape 3: Éteignez votre imprimante 3D LCD et retirez les deux boulons fixant la cuve de résine.
Étape 4: Retirez la cuve de résine de l’imprimante 3D et posez-la sur une surface plane et stable.
Étape 5: Vaporisez de l’alcool isopropylique 99% sur la cuve de résine et nettoyez-la avec une serviette en papier ou un chiffon en fibre.
Étape 6: Dévissez les vis placées à l’arrière de la cuve à résine.
Étape 7: Retirez le cadre du film FEP de la cuve de résine et retirez le film FEP.
Installation du nouveau film FEP
Étape 1: Vaporisez un peu d’alcool isopropylique 99% sur le cadre du film FEP et nettoyez-le avec une serviette en papier ou un chiffon en fibre.
Étape 2: Placez le film FEP entre la cuve en résine et le cadre du film FEP.
Étape 3: Serrez légèrement les vis dans les coins en premier. Continuez ensuite sur les côtés.
Étape 4: Une fois toutes les vis en place, serrez-les complètement.
Étape 5: Utilisez un couteau universel pour couper le film FEP excessif de la cuve de résine.
Étape 6: réinstallez la cuve de résine sur l’imprimante 3D LCD.
Conseil:
Si les vis ne peuvent pas être desserrées, cela signifie que la résine a pénétré dans les joints de vis. Pour résoudre ce problème, vaporisez de l’alcool isopropylique 99% sur les joints vissés et laissez reposer pendant environ 15 minutes avant de réessayer.
Infolettre
Pour recevoir nos nouvelles et promotions
© 2026 DenPlus Inc. | Copyright | Conception Web : ViGlob